House Plant Care: Hoya Tricolor

hoya tricolor plant care

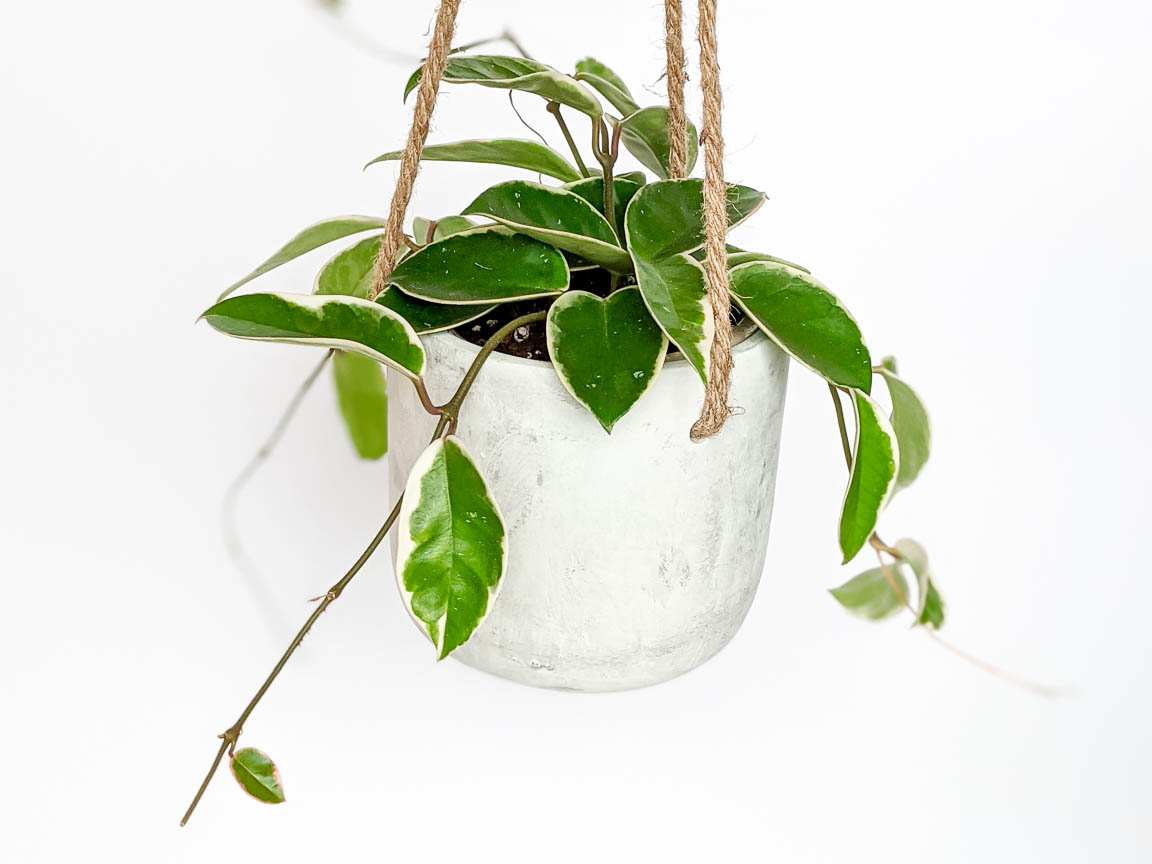
I don’t know about you, but I love variegation and vining plants. So, it makes sense that one of my favorite plants is the Hoya Tricolor! Hoyas are part of a genus of over 200 tropical plants most known for their tough, waxy, and diverse leaves. In fact, the Hoya family of plants has some of the greatest variety of leaf shapes and colors!

Hoyas are part of the “perfect starter plant” club, as they prefer lower light levels and need infrequent watering. They’re also non-toxic to both dogs and cats, making them safe to display anywhere. As a vining plant, however, Hoyas are often showcased in hanging planters or shelf-tops to allow their vines to trail freely.

Hoya plants are naturally tropical, which means they love humidity but prefer dryer soil. In the wild, many Hoya plants are epiphytic, meaning they grow on other trees or plants. When choosing a good pot for these plants, terra cotta or clay pots are ideal to help pull excess moisture from the soil.

One of the best-kept secrets of Hoya plants is their flowers! When well cared for, Hoyas will bloom and produce star-shaped flowers in red, purple, pink, yellow, white, and other colors. Here’s how to care for these gorgeous vining plants:

Water

Hoya tricolor plants don’t need much water, and they don’t like it too often either. This is because Hoyas store water in their leaves similar to succulents. Wait until the soil is almost completely dry and then water thoroughly until the water runs out the drainage hole. You won’t need to water this indoor plant as often as others. Use a bamboo skewer to check the moisture level in the bottom of the pot before watering again.

Sunlight

Hoyas prefer bright, indirect sunlight. Place your Hoya plant near a west or east-facing window, but not too close. Keep them just far enough away for them to miss direct sun on their leaves. However, the brighter the indirect light, the more likely your Hoya will produce variegated leaves or even flowers!

Fertilizer

Hoyas do well when fed with all-purpose fertilizer about once a month (or about every other watering). You only need to fertilize in the spring and summer when they’re actively growing. Be sure the soil is moist before adding the food! It’s best to avoid all fertilizing, propagating, and repotting during the dormant winter months.

Soil

Hoya tricolor plants need well-draining soil. They’ll grow best with a mixture of potting soil, succulent soil, and perlite or orchid bark. This mixture will provide enough room for excess water to drain after the roots and leaves have become saturated. If you aren’t able to create your own mixture, succulent soil works well.

Propagation

Hoyas are very easy to propagate! Like other vining plants, leaves and vines with root nodes can be snipped and placed in water to grow. These plants can also be propagated in the soil after new roots have grown at least 2-3 inches. Just be patient. Hoyas are slow movers, so it may take a few months for them to start showing signs of growth.


If you’re looking for a great plant for beginners, this one’s for you! Already have a favorite Hoya plant? Tell me in the comments, or share your story on my Instagram post!

XO,
Micah
The Ultimate Guide to Pruning Houseplants

Pruning may sound like it belongs to your shrubs outside, but it’s a health and aesthetic benefit for many indoor plants, too. Don’t worry, pruning houseplants doesn’t involve bulky hedge trimmers. It’s actually a more delicate grooming process rather than hacking your plant’s stems and vines off.

The benefits of pruning houseplants

Pruning is a good technique to become familiar with because it’s a great way to maintain your plants and propagate more! Part of pruning involves removing dead vines, leaves, and stems that are draining energy from your plant. Without this “dead” weight, your plant is free to produce new, healthy growth. Pruning also prevents indoor plants from becoming too large and lopsided. If many stems or vines are crowding each other, pruning makes it easier for plants to breathe and grow.

How to prune houseplants

For best results, pruning should follow general techniques and schedules. Pruning can be detrimental depending on the time of year and is not recommended for some houseplants, like palms, African violets, and orchids. For most other indoor plants, here’s your step-by-step guide:

1. Be mindful of seasons

The best time to prune houseplants is in the spring and summer when they’re at the height of their growing season. Fall and winter, in general, should be reserved only for removing dead leaves and foliage or trimming diseased vines or branches. However, tough Ivies can be pruned year-round, while fast-growing climbers like Wandering Jude can be pinched back all year.

2. Look at the big picture

Effective pruning starts with knowing your plant’s current shape and structure. Notice some areas are spindly? Maybe other sections have dead leaves or looking too crowded. Having a plan of where to pinch and prune will make the whole process easier for you–and your plant.

3. Remove dead or yellowing foliage

Before making any official cuts, first remove any leaves, vines, or branches that are dead, dying, or diseased. Remove these by hand or cutting them off at the base. This initial pruning alone won’t affect your plant, but instead, allow it to focus more energy on creating new growth!

4. Stick to the one-third rule

Once you move on to actual pruning, it’s important that you don’t cut back more than 1/3 of your plant. This ensures that there is enough healthy foundation for continued growth. Start slowly, you can always prune a little extra later. Thim areas that seem to be overcrowded (remember, you can save these propagated portions if they have a root node!) to improve your plant’s shape.

5. Provide a little extra TLC

While pruning is healthy for your plants, it can still cause short-term stress. Give your houseplants a little extra love by moving them to an area with indirect light. Refrain from repotting or fertilizing your plant at the same time you prune to avoid any additional stress. And be more cautious when watering. With less foliage, your plant might not need as much water, even during its growing season.


Do you have a regular pruning schedule? Have you noticed a difference in your plant’s health if you do or don’t prune? Tell me in the comments!

XO,
Micah

Mistakes to Avoid When Repotting Indoor plants

repotting indoor plants mistakes

Repotting indoor plants can be a tricky business. Even if you know the perfect time to repot or its benefits, it still is possible to make a few mistakes during the process. Mistakes that can lead to transplant shock—a condition that just as bad as it sounds. We all want our indoor plants to live long, healthy lives. So, it’s helpful to understand why transplant shock occurs before attempting to repot!

What is transplant shock?
Transplant shock means that your plant has undergone significant stress during the repotting process. This can affect your plant’s health, increasing the risk of it not fully recovering. Damaged plant or root systems can’t absorb the nutrients it needs to grow healthy and strong. Similarly, if their living situations change as well as their pot, this can cause distress as well.

How to reduce the risk of transplant shock

  1. Don’t trim the roots. A plant’s roots are how they absorb water. It’s not necessary to trim roots, especially if they’re growing out the drainage hole, unless they have root rot. Healthy roots are a pale yellow-white color, while rotted roots are black. Trimming damaged roots will actually improve your plant’s long-term health. When repotting, also try to avoid breaking or damaging healthy roots.
  2. Don’t choose the wrong pot size. It might be tempting to choose a much larger pot to avoid repotting your indoor plant in the future. But this can be a mistake. Most indoor plants prefer to fit snuggly in their pot. Too big of a pot, and your plant will expend more energy extending its roots than growing new leaves and stems. Similarly, don’t try to squeeze your plant’s roots into a same-sized container. Choose a pot that is a few inches greater in diameter than your plant.
  3. Don’t remove all of the soil. One of the main purposes of repotting plants is to give them fresh, nutrient-rich soil. But it isn’t necessary to remove all the soil from around the root ball beforehand. The key is to not disturb the fragile roots in the process. However, if your plant is infested with pests or is diseased, remove as much of the soil as possible and rinse roots before repotting.
  4. Don’t repot if the plant is dormant. Plants go through phases of dormancy (usually winter) and growth (usually spring and summer). Avoid repotting indoor plants during their dormant phase when they’re resting and strengthening their roots. Wait until your plant is actively growing and creating new leaves before repotting to ensure it remains healthy in its new environment.
  5. Don’t relocate your plant. Once you have successfully repotted your plant, keep it in the same location as it recovers. Plants are highly sensitive to changes in light and temperature. They’re also more sensitive to these changes directly after being repotting. If you find a better spot in your home to keep your plant, wait a week or two before moving.

Be sure to give your plants a little extra love after repotting. They’ll need a little time to recover, but will be thriving again in no time! Have any of your plants experienced transplant shock? Share your experiences in the comments!

XO,
Micah